We live in a modernized world where technology is drastically advancing each and everyday. So many interesting devices have been introduced and these devices cater towards different uses in our daily lives. Amongst all the equipment smartphones have taken a great place in human life with such an increasing demand. We live in times where we cannot live without our smartphones. They are our best pals. They are easy to use and very user friendly.

We are all somewhat addicted to our smartphones. We can also do all our work related tasks using our phone by just sitting at home. The phone barely leaves our hand. It's true that we get important calls through our phones but also sometimes things get complicated when we get anonymous calls. These unknown people can really get to our nerves if they keep on calling. Sometimes the other party would be calling you on repeat mode for fun but your time is precious and you don't want to waste your time on something silly. If the problem persists then we have to block the phone number instantly but let's say the caller is now using another number to annoy you since you blocked the previous one. What are you going to do in this case? We should be putting an end to this issue without creating any problems. If you at least know the person you could do something but if you don't know the caller things can get out of hand. So to overcome this problem we will suggest you an app. Let's take a look.
With the use of this app you can easily find out the person who disturbs you. To put an end to those annoying wrong calls the app called 'Eyecon' is used. Do you know what's really interesting about this app? This app is not limited to showing only the unknown called name but also shows the picture of the caller if we enter the number. This app works by collecting information of the number you entered by means of social Media such as Facebook, Instagram etc. If the specific number is linked to any of his or her social media it will snatch the photo of the person. As we all know most of the people connect their mobile numbers to their social media so using the app 'Eyecon' will be so easy to find out the person. This will allow you to have a proof of the culprit. Hopefully this will stop you from getting unwanted calls again. There are also some other features in this app such as blocking the person, opening WhatsApp with just one click if you find the person's number and so many other options. So now we know the app that you should be downloading, will move on with how to use the app with all the necessary details.
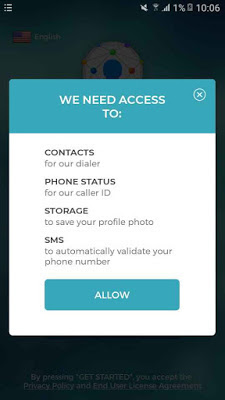
Then for your app to access your contacts, SMS and storage you have to allow all permission. This will let your app work without any interference.
Now that you have created the app profile so you can head to home screen now. On the home screen go to the 'Search bar'.
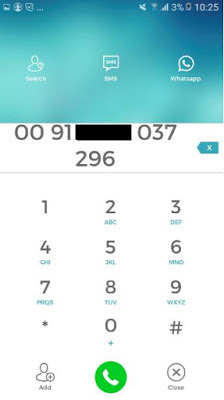
In the search bar add the specific number along with the country code to get hold of the person who is annoying you.
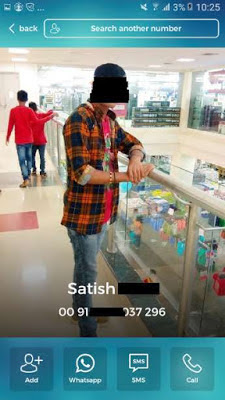
Finally the app will direct you to the caller's Facebook profile so that you can identify the name and the picture.
This is all what we got to do to find out the person who calls you to annoy the hell out of you. Now you don't have to worry about anyone calling your phone since you can get all the information easily. So you can download 'Eyecon' app directly from Google playstore to your Android smartphone by Clicking here.
Do you know that you can block the annoying contacts using the 'Eyecon' app. This can be done in the setting tab.

Hope you found the solution to stop anonymous calls from annoying you all the time. You can also suggest this app for your friends. Put a full stop to your problem by allowing the app to show you the name and the picture of the person who is calling you. If you found this article useful please drop a message in the comment section below.
We humans carry our smartphones wherever we go. From youngsters to the old generation everyone owns a phone. There are numerous features available in that flat slim device which is amazing. Nowadays we don't have to miss any important phone calls as you can use the mobile phone on the go. The features like call, messages, camera, alarm, music player, documents and etc.. are all available in your device. People are now replacing the computer with a mobile phone as it is easy to use. People are so drawn into smartphones they use it everyday to work and for entertainment. This is also becoming an annoyance sometimes. Sometimes we get irritated by Coming across so many unknown calls and nuisance messages. Let's take a look at how to solve this issue.
We are all somewhat addicted to our smartphones. We can also do all our work related tasks using our phone by just sitting at home. The phone barely leaves our hand. It's true that we get important calls through our phones but also sometimes things get complicated when we get anonymous calls. These unknown people can really get to our nerves if they keep on calling. Sometimes the other party would be calling you on repeat mode for fun but your time is precious and you don't want to waste your time on something silly. If the problem persists then we have to block the phone number instantly but let's say the caller is now using another number to annoy you since you blocked the previous one. What are you going to do in this case? We should be putting an end to this issue without creating any problems. If you at least know the person you could do something but if you don't know the caller things can get out of hand. So to overcome this problem we will suggest you an app. Let's take a look.
With the use of this app you can easily find out the person who disturbs you. To put an end to those annoying wrong calls the app called 'Eyecon' is used. Do you know what's really interesting about this app? This app is not limited to showing only the unknown called name but also shows the picture of the caller if we enter the number. This app works by collecting information of the number you entered by means of social Media such as Facebook, Instagram etc. If the specific number is linked to any of his or her social media it will snatch the photo of the person. As we all know most of the people connect their mobile numbers to their social media so using the app 'Eyecon' will be so easy to find out the person. This will allow you to have a proof of the culprit. Hopefully this will stop you from getting unwanted calls again. There are also some other features in this app such as blocking the person, opening WhatsApp with just one click if you find the person's number and so many other options. So now we know the app that you should be downloading, will move on with how to use the app with all the necessary details.
Find Unknown Caller With Their Name And Photo
You have to get the app named 'Eyecon' directly from Google playstore to your Android smartphone or tablet.Let us move on to know how to find out the anonymous caller with their name and social media profile photo.
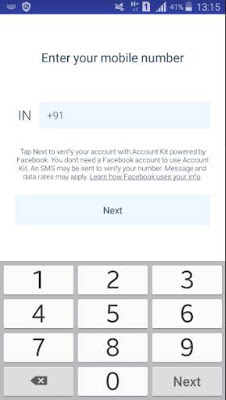
Firstly launch the app in your phone and you have to get registered with your phone number.
Firstly launch the app in your phone and you have to get registered with your phone number.
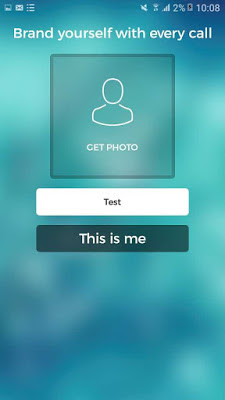
Next you have to add your name along with an intended picture to create your profile with Eyecon app.
Do you know that you can block the annoying contacts using the 'Eyecon' app. This can be done in the setting tab.